SWTOR Nightmare Brontes Dread Fortress Guide
A guide to Nightmare Bronutes, the last boss of Nightmare Dread Fortress released with SWTOR game update 2.7. Class specific tips written by Carl & Vindrik
Updated for live with videos from strategy for the final phase and kill videos from multiple PoVs.
Navigation
- General Info
- Detailed Mechanics
- Tank Specific Tips
- Healer Specific Tips
- DPS Specific Tips
- DPS Class Pros and Cons
General Info
HP:
Enrage: ?
Loot: 2 random Dread Touched item (rating 186), 1 Unassembled Dread Master Armor, Wings of the Architect mount
Key differences from Hardmode
- Phase 1: Energy spheres added for this phase, also two Finger of Brontes spawn instead of just one.
- P1->P2 transition: This transition phase is a bit extended as about 6-7 pairs of Reach of Brontes spawn than just 4 in hardmode. Also everyone will be slowed but you can break out of it for a few seconds by using your stun breaker or class specific abilities such as Force Speed etc to avoid death from the beams. Your incoming heal is reduced significantly while in this transition.
- Phase 2: Energy Spheres continue in this phase. Also Kephess clone will also jump on a random player, dealing large amount of damage to the player and anyone caught inside the red circle (similar mechanic to Kephess in TFB).
- 50% transition: The beam from Brontes now can swing either clockwise or counterclockwise (randomized) so you need to prepare for both scenarios.
- Phase 3: The six Fingers of Brontes now perform a knockback and you cannot go back to the same Finger after the knockback. You will need to perform some sort of rotation (see Detailed Mechanics)
- Phase 4: Energy Spheres were added to this phase and tanks will need to use the two Hands of Brontes to squash the Energy Spheres as they come out. Tons of outgoing damage and very difficult phase.
Video
Sorc Healer PoV
Operative DPS PoV
Assassin Tank PoV
Detailed Mechanics
Phase 1
Phase 1 isn’t too different from hardmode except for the addition of Energy Spheres and an additional Finger of Brontes that need to be dealt with.
Phase 1 –> Phase 2 transition
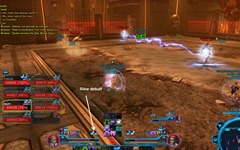
The transition is now abit harder since the raid now receives a debuff that slow their movement speed and more than four set of Reach of Brontes spawn with their connecting beam (about 6-7 sets spawn). You can remove the slow debuff temporarily by using your CC breaker or class specific abilities but they will reapply a few seconds later. Save these cooldowns for when you in immediate danger of getting killed by a beam.
Phase 2
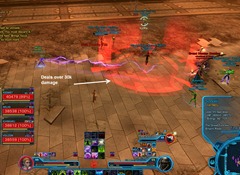
In addition to the Energy Spheres that spawn immediately at the start of the phase, the raid will also need to deal with Kephess’s red circles. This red circle is placed on a random raid member and deals over fair bit of damage to the targeted player and anyone else inside the red circle. Certain DPS class such as Snipers, Operatives and their Republic equivalent can avoid the damage entirely. Force Barrier also works against it.
Make sure to cleanse the DoT from Kephess ASAP as it can deal quite a lot of damage if it reaches 3 stacks.
You will need to watch your DPS carefully and ensure that you don’t trigger the 50% transition with a Kephess Clone or Energy Sphere up as they can ruin your transition.
50% Transition
A newly added challenge to the 50% transition is that beams can go in either direction. This does punish the melee DPS a bit as you cannot simply run to the first droid and get setup like in hardmode. You will need to watch to see which direction the beam rotates and then jump to the appropriate droid.
A Predation/Transcendence from your marauder/sentinel can greatly help with this transition.
Phase 3
In phase 3, Fingers of Brontes have increased HP and gained a knockback that prevent you from going back to the same Finger. This require you to setup a rotation so that your raid members knows exactly which Finger they are going for next after the knockback.
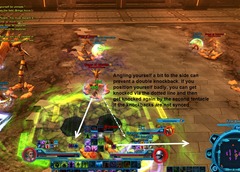
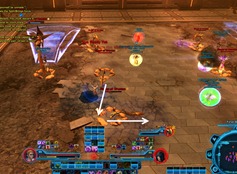
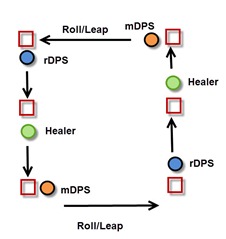
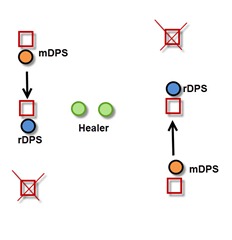
Assuming a balanced operation group of 2 melee DPS (mDPS) and 2 ranged DPS (rDPS), here is the setup we use. You need to position yourself against the Finger so that you are knocked into the next Finger you need to get to. However, you need to be extra careful of a double knockback that can occur when the finger knockbacks are not synced. To avoid this, you need to make sure you are not aiming towards the direction that your next tentacle is going to knock towards to. A double knockback can result in an instant raid wipe with 2-3 players dying instantly and rest of the raid following shortly.
Top of this picture is where Brontes stands when you first start the fight.
- Healer stand beside the middle Fingers so that one get knocked to bottom left and the other get knocked to top right.
- mDPS stand beside the bottom left and top right fingers and when the knockback is about to happen, they roll/leap across to the next Finger they need to go to after the knockback (knockback doesn’t push you far enough to get across)
- rDPS will be standing beside the top left and bottom right Fingers and get knocked to the middle Fingers the healers were standing. rDPS will be helping to get the mDPS fingers down first so that when the first knockback occurs, the mDPS fingers are close to dying (~10% HP usually). They can then finish them off once the knockback occurs.
The initial healer Fingers will be first two to die with help with mDPS and rDPS. This frees up the healers to move around and heal rest of the raid without having to worry about their Fingers going enrage. Once these two are dead, rDPS will be helping to kill the ones the mDPS are attacking again and this should finish another pair of Fingers before the next round of knockback.
On the second round of knockback, mDPS will get knocked into the fingers the rDPS were standing next to and can help finish them off.
Phase 4
Phase 4 is the most difficult part of the fight due the high amount of damage and RNG. Brontes will start off immune at the beginning of this phase and heal up to ~62%. You can watch her channel and throw a cybertech grenade with ~0.1s left on the immunity channel so that the grenade DoT will tick in immediately after the the immunity bubble wears off for maximum DPS.
Phase 4.1
Tanks will be receiving Brontes’ Fire and Forgot knockback first since Brontes is basing it off threat in the last phase. Tanks will need to position themselves so that they get knocked to their Hands of Brontes with this knockback.
After the initial knockback, tanks will be handling the Hands and attempting to slam any Energy Spheres coming to the raid. This part is fairly RNG as Energy Spheres can target tanks and tanks could get knocked by the Hands right into their own sphere (often at 1 stack or so), resulting in an instant tank death.
- Energy Spheres can be crowd controlled, especially if they are in a tricky spot and likely to run into the raid. Marauder/Sniper’s Slice Droid and Sorcerer Whirlwind etc and their Republic counterparts all work well for this.
- If an Energy Sphere is CC’’ed, they will continue to gain stacks. If you wish to “pop” them normally, you will need to attack them again to break the CC before running into them. However, they can be slammed by Hands while being CC’ed so CC serve as a useful method to freeze them in place while tanks take their time getting to them.
- If an Energy Sphere reaches 20 stacks in this phase, it is an instant raid wipe with the Supremacy debuff.
Rest of the raid will be stacked a bit in the middle with their backs towards the entrance wall. Snipers should deploy their shields to decrease raidwide damge. If you have DPS that can offtaunt, they will come in very handy here to control Brontes. Otherwise, she will likely be all over the place
- If you don’t position yourself properly, Brontes’ Fire and Forget knockback can knock you into a Hand slam, resulting in your death.
Phase 4.1 should last from 62-35% (it can vary depending on your DPS) but no more than 7 Supremacy stacks as anything higher will cause your raid members to die from Fire and Forgot or additional Supremacy damage. At around 38% or 5-6 stacks of Supremacy, the raid leader should call push and all the DPS should be focused on bringing down the Hand of Brontes to the right of the raid (closest). All raid members should rush inside the shield provided by the defeated Hand and cleanse their stacks and heal up. While the shield is active, you are protected from Brontes’s attacks and the explosions from Energy Spheres so this should be used to your advantage to eliminate as many Energy Spheres as possible.
- Assassin tanks have an advantage here as they can drop a Phase walk near the far tentacle and port there during the shield phase to grab the other tentacle and prevent it slamming the raid as soon as the shield drops.
Phase 4.2
When you emerge from the shield, the tank that no longer has the Hand will need to taunt Brontes and position himself in the middle of the right wall. Phase 4.2 should last around 38-24% but may vary depending on how close the Energy Spheres get to 20 stacks as the shield provided by the defeated Hand can provide protection against explosions from 20 stacks Energy Spheres.
Phase 4.3
From this point on, it is all out DPS with tanks running through Energy Spheres that are close to 20 stacks so that DPS can focused on bringing Brontes down. There is a lot of raidwide damage and raid members may start dropping dead one by one. Healers may stop healing and focus on DPS as Brontes is close to dying. A lot of Brontes wipes occur at very low % (i.e. one at 200ish HP occurred to us) so every bit of DPS counts.
Tank specific tips
There isn’t any special requirement for tanks in this fight, as each has benefits and detriments. Depending on what your group is lacking during the fight, changing your tank combination may be able to help fix some of your issues.
Keep in mind these important mechanics that you can take advantage of:
- Taunt will force a lightning ball to follow you for the duration of the taunt. If you don’t collide with it before the effect wears off, it will return to its old target. As such, you shouldn’t taunt a ball at low stacks unless you can mitigate its damage entirely through Force Shroud or Saber Reflect.
Juggernaut/Guardian
Although Juggs/Guardian have no pull and no movement ability, which both come in very handy for this fight, their other utility gives them different advantages.
Saber Reflect: Depending on the phase, you will use this for different abilities;
- Phase 1: Depending on which tentacle you are tanking and your strategy to kill them, there will be 1 slam per phase that will hit an attuned tank, and if dps is slow it can hit 2 or 3 times. Being able to remove this damage is ideal.
- Transition P1-2: You will often get a lightning ball chasing someone during this transition, and although you can’t pull it you can mitigate its damage. Use Saber Reflect, then Charge/Leap and Taunt the ball, stopping its damage from being an issue.
- Transition P2-3: You can utilise Saber Reflect here to get aggro on as many droids as possible, then reflect all their damage back for a few seconds.
- Phase 3: This phase shouldn’t be an issue for you and CDs shouldn’t be necessary, but you can use it in an emergency.
- Phase 4: Usage here is highly dependent on your specific strategy. Options include avoiding emergency damage or detonating lightning balls (multiple at once is particularly helpful).
Intercede/Guardian leap: Best usage is to mitigate lightning ball tick damage, but should be used liberally throughout the fight.
Threatening Scream/Challenging Call AoE Shield: You’ll have plenty of opportunities to drop your shield throughout the fight. Most notably are tank swaps during Phase 2 and during Phase 4, since there’s so much incoming damage.
Powertech/Vanguard
The biggest detriment you have here is the inability to fully absorb a lightning ball explosion, however your ranged abilities and utility come in particularly handy.
Grapple: You can pull a lightning ball to you and taunt it to force a detonation, which is particularly handy during transitions. However, since you can’t fully mitigate the damage you should be aware of the ball’s stacks at the time.
Ranged AoE Taunt: This comes in particularly handy to control lightning balls, especially during Phase 4, giving you have another ability to ensure they get smashed.
Ranged Abilities: Being able to stand at range and still deal damage is particularly useful against tentacles in general, and against the droids during the clock phase.
Hydraulic Overrides/Hold the Line: This comes most in handy when you need to quickly position yourself to use a tentacle to smash a lightning ball, both for the movement speed and removing the following knockback.
Assassin/Shadow
Assassins have the best of both worlds for controlling lightning balls, combined with good movement and high off-tank DPS, making them particularly useful for this fight.
Force Shroud/Resilience: Depending on the phase, you will use this for different abilities;
- Phase 1: Most useful to pop lightning balls.
- Transition P1-2: You will likely get a lightning ball chasing someone during this transition, and you have an excellent toolset to deal with it. Just get in range, Force Shroud, Force Pull and Taunt, and you’ll mitigate all its damage.
- Phase 2: Avoid the damage from Arcing Assault.
- Transition P2-3: Pop the stray lightning ball you will often have spawn at the beginning of the transition.
- Phase 3: You shouldn’t have an issue with this phase and cooldowns aren’t necessary, so it’s suggested you save it unless there’s an emergency.
- Phase 4: Depending on your strategy here there are multiple uses for this phase, but the best options are either to detonate lightning balls (several at once is particularly helpful) or mitigate dangerous slam damage.
Force Pull: Very helpful for pulling lightning balls to you and forcing an explosion with Taunt, however make sure you’re away from the group when you do this.
Phase Walk: Knowing your own movements and where you will need will help you place Phase Walk in the most strategic location for your group, in addition to its inherent healing bonus.
Stealth Rez: As a tank stealth rezzing in this fight is hard, but your best options are;
- Phase 1: Any time you are not required to tank a tentacle and fingers aren’t going to spawn.
- Transition P1-2: If you aren’t tanking Brontes first, you can use this immediately after the final tentacle spawn.
- Phase 2: You won’t have time in this phase except for at the very beginning.
- Transition P2-3: After you’ve killed the first few droids you are basically free to stealth rez. You’re not at much risk of being pulled back into combat.
- Phase 3: The only window is after your tentacle dies as the phase transitions, since any earlier will get lightning ball spawns pulling you into combat, and any later will have Brontes’ spawn doing the same.
- Phase 4: As just noted, the only time is while she’s shielded during the transition.
Healer Specific Tips
This fight is particularly difficult for healers, especially during the last phase where everything can go to hell in a couple of seconds. Fortunately, the transitions offer you a reasonable amount of respite between phases.
Sorcerer/Sage
Shields and AoE healing are of particular use during this fight, and you should make sure you know the best times to be using them for maximum benefit.
Static Barrier/Force Armor: Shielding targets of lightning balls and Kephess jumps are the main mechanical differences beyond regular incoming damage.
Extricate/Rescue: This comes in handy for pulling people out of reticles or away from lightning balls when they’re not paying attention. Of course, you then have the right to yell at them for being completely oblivious.
AoE Heals: You will spend a great deal of time grouped up throughout the fight, making your AoE healing particularly potent.
Force Barrier: Can be used to mitigate certain dangerous incoming damage, such as a lightning ball detonation or a Kephess jump.
Force Speed: Handy during transitions and for positioning during the final phase.
Operative/Scoundrel
You’ll have plenty of opportunities to stealth rez throughout the fight, and your skillset is very well adapted to this kind of fight.
Hots: You get plenty of time during transitions etc to stack hots on primary targets to make sure that your healing is well balanced and your Energy is properly managed throughout the phase.
Evasion/Dodge: Very handy to avoid Kephess jump damage or droid fire during the Phase 2-3 transition.
Exfiltrate: Helps significantly with movement throughout the fight, as well as having another option to try and avoid Kephess jump damage if Evasion is on CD.
Shield Probe/Defense Screen: It has a tiny cooldown now. You should be using it all the time, since you’ll often be taking incidental damage from fingers, lightning balls, Kephess, etc.
Orbital Strike: Due to the long transition times, you’ll always have plenty of opportunity to use Orbital Strike to help out the DPS. Although it’s not as powerful as it used to be, every little bit counts.
Burst DPS: Having pre-cast Orbital Strike/XS Flyby, Explosive Probe/Sabotage Charge, Shiv/Blaster Whip and Backstab/Backblast come in handy to help out with damage wherever you can, especially during the clock phase.
Stealth Rez: With the exception of the last phase, this fight is very stealth rez friendly. Your other healer shouldn’t have much of an issue solo healing while you rez, and timing isn’t particularly difficult as long as you’re aware of all the mechanics.
- Phase 1: While fingers aren’t about to spawn and immediately after a lightning ball is ideal.
- Transition P1-2: Immediately after the final tentacle spawn, before Brontes begins her attack is the only time you can risk it during this transition.
- Phase 2: Either immediately after a Kephess clone is killed, spawns or jumps is the best timing window, as these are the times you’re least likely to be pulled back into combat.
- Transition P2-3: After you’ve killed the first few droids and you’re well ahead of the clock you can take the time to stealth rez, however doing it any earlier is risky as you’ll likely fail the timing. If a DPS is dead going into that phase and you can’t battle rez them you’ve basically already failed anyway.
- Phase 3: When you are no longer tanking a finger you will have the opportunity, just be aware of your group’s health status at the time.
- Phase 4: Only during the transition from Phase 3 before she breaks out of her bubble, after that it’s not even worth risking it, as the damage going out will be too intense and you will always be pulled back into combat before you can finish.
Mercenary/Commando
Kolto Bomb/Kolto Missile: Although during certain phases there is a lot of movement, you will also spend a lot of time grouped together throughout the fight.
Hydraulic Overrides/Hold the Line: Great for transitions and for movement in general, but there isn’t any extra physics to worry about.
Burst Heals: Occasionally you might get some pretty poor RNG, such as being stunned in a reticle or having a lightning ball and a Kephess jump on the same target, so being able to quickly top someone up in a pinch is very handy.
Burst DPS: Be sure to utilise your damage as much as possible throughout the fight, particularly during tricky phases such as the clock phase.
Kolto Shell/Trauma Probe: This is a great fight for Kolto Shell/Trauma Probe, especially because there is a lot of raid damage going out and there are long transitions where you can afford to use it on everyone without overheating.
DPS Specific Tips
This fight is particularly difficult for DPS, because it takes a combination of high sustained damage, phases of high burst, several movement mechanics and a great deal of survival skills. We’ve made a list of recommended specs, however this fight more than any other comes down more to the player than their class or spec:
Marauder/Sentinel: Anything but Rage/Focus
Even with its high burst, Rage/Focus’s sustained damage isn’t high enough. Carnage/Combat will perform best early on but not as well towards the end of the fight due to high movement requirements, but DotSmash/Dotsweep and Annihilation/Watchman deal better with mobility, as well as Annihilation/Watchman heals being handy.
Juggernaut/Guardian: Vengeance/Vigilance
Making this decision as a Jugg/Guardian can be difficult, since the higher movement requirements but a slight damper on Vengeance/Vigilance, but its overall damage is still going to be higher. Either is viable, but you’d probably do better with Vengeance/Vigilance than Rage/Focus
Powertech/Vanguard: Pyro/Assault Specialist
The higher sustained and burst damage makes this an easy choice, especially considering the AoE benefit of AP/Tactics Flamethrower/Pulse Cannon is useless for this fight.
Mercenary/Commando: Either
Although Pyro/Assault Specialist has better burst and overall damage, during certain parts of the fight in particular, Heat management can be an issue. This one is a personal decision based on the needs of your group. If your group’s damage is fine but you’re lacking survivability or having trouble with the clock phase, you should probably spec Arsenal/Gunnery, but if this isn’t an issue then Pyro/Assault Specialist will provide you with better overall damage output.
Operative/Scoundrel: Concealment/Scrapper
The required setup time from Lethality/Dirty Fighting just isn’t viable for this fight, and the damage output from Concealment/Scrapper will be significantly higher with no other drawbacks.
Sniper/Gunslinger: Any
This depends on your group makeup and what you require. Hybrid or Lethality/Dirty Fighting can be very slow, however if you have enough burst from your other DPS this isn’t an issue. A particularly skilled Engineering/Saboteur sniper/gunslinger can also make Rollbang viable, as the burst is very helpful, however it’s definitely not suggested for this fight. Marksmanship/Sharpshooter is probably the most well-rounded for this encounter due to its decent burst and sustained damage, however if you’re finding that your damage isn’t high enough for the final phase, you may want to consider trying Hybrid or Lethality/Dirty Fighting instead.
Assassin/Shadow: Madness/Balance
The sustained damage bonus from Madness/Balance makes it a more viable option than Deception/Infiltration, however if played properly the burst from Deception/Infiltration can be very useful. The issue then becomes whether sustained damage is high enough for the final phase, which should help shape your decision for which spec suits your group best.
Sorcerer/Sage: Either
Although you will likely see better overall damage with Lightning/Telekinetics for this fight, Madness/Balance’ extra healing and damage reduction while stunned for the final phase can make a significant impact on whether you survive or not. This choice should be made based on player preference and play style.
DPS Class Pros and Cons
Marauder/Sentinel
Bloodthirst/Inspiration and Predation/Transcendence both provide excellent utility that make this fight significantly easier; it is suggested that you have these at your disposal.
Pros
- Carnage/Combat: Burst and sustained damage, AoE damage reduction, faster Predation/Transcendence
- Annihilation/Watchman: Sustained damage and group heals, damage reduction debuff, high mobility
- DotSmash/Dotsweep: Burst and sustained damage, high mobility
Cons
- Carnage/Combat: Doesn’t deal well with the high movement requirement
- Annihilation/Watchman: Low burst potential
- DotSmash/Dotsweep: Burst not as high as Carnage, reliance on Berserk makes using Bloodthirst more difficult
Juggernaut/Guardian
This class has excellent utility for the fight. Great defensive CDs, armor reduction, Intercede/Guardian Leap and Taunts help to make the fight much simpler.
Pros
- Vengeance/Vigilance: Burst and sustained damage
- Rage/Focus: Higher burst capability
Cons
- Vengeance/Vigilance: Doesn’t deal as well with high movement requirement
- Rage/Focus: Lower sustained damage
Powertech/Vanguard
Having some tanking utility, like the Juggernaut, makes this class particularly useful in this fight, making the fight simpler as a whole.
Pros
- Pyrotech/Assault Specialist: Burst and sustained damage
- Advanced Prototype/Tactics: Burst and increased survivability
Cons
- Pyrotech/Assault Specialist: Doesn’t deal well with high movement requirement
- Advanced Prototype/Tactics: Doesn’t deal well with high movement requirement, lower sustained damage
Mercenary/Commando
Having great overall damage output and survivability makes up for the fact that this fight is particularly difficult to play as a Mercenary.
Pros
- Pyrotech/Assault Specialist: Burst and sustained damage
- Arsenal/Gunnery: Higher burst and significantly more utility in the form off off-heals and armor reduction application
Cons
- Pyrotech/Assault Specialist: Doesn’t deal as well with target swapping
- Arsenal/Gunnery: Significantly lower sustained damage
Operative/Scoundrel
Provide a combination of excellent utility and high damage output for the fight, making them an excellent choice overall.
Pros
- Concealment/Scrapper: Burst and sustained damage, better mobility and survivability
- Lethality/Dirty Fighting: Deals better with high movement requirements due to ranged capability
Cons
- Concealment/Scrapper: Doesn’t deal as well with high movement requirement and necessity for Backstab positioning
- Lethality/Dirty Fighting: Significantly lower burst and sustained dps
Sniper/Gunslinger
Excellent defensive CDs, utility and overall damage output make this a great class in general for any fight, but particularly for something as demanding as Brontes.
Pros
- Marksmanship/Sharpshooter: Burst damage, high survivability and mobility
- Lethality/Dirty Fighting: High sustained damage
- Hybrid: High sustained damage, adequate burst
- Engineering/Saboteur: Insane burst damage
Cons
- Marksmanship/Sharpshooter: Slightly lower sustained damage
- Lethality/Dirty Fighting: High setup time, low burst and low survivability
- Hybrid: High setup time and low survivability
- Engineering/Saboteur: Exceedingly difficult to manage for this fight, lower sustained damage
Assassin/Shadow
Great combination of mobility and utility, however contrasted by less powerful damage output. Lower damage output versus other classes make this class particularly difficult to manage in such a demanding fight.
Pros
- Madness/Balance: Sustained damage, adequate burst, self-heals
- Hybrid and Deception/Infiltration: High burst damage
Cons
- Madness/Balance: Burst damage not as high
- Hybrid and Deception/Infiltration: Doesn’t deal well with high movement requirements, lower utility and survivability
Sorcerer/Sage
Provides an excellent combination of utility and damage, making them a great choice.
Pros
- Madness/Balance: Burst and sustained damage, self-heals, damage reduction while stunned helps with making the final phase more manageable
- Lightning/Telekinetics: Slightly higher burst, sustained damage and resource management
Cons
- Madness/Balance: Utility can be taxing on resource management
- Lightning/Telekinetics: Lower survivability


