


SWTOR Hardmode Revan TOS Operation Guide by Zorz
SWTOR Revan Hardmode Temple of Sacrifice Operation Guide written by Zorz.
Contents
Basic Info
Gear Recommendation
- Full 198 Revanite gear is recommended.
Health
- Revan: 5.4 mil (3599810)
- HK-47: 1.5 mil (1079943)
- Meatbag Entropy Enhancer: 100k (102230)
- Machine Focus: 113k x4 (113138)
- Machine Core: 2.2 mil (2206183)
Enrage
- 11 minutes
Loot
- “The Revanchist” title
- 1x Unassembled Revanite Mainhand (198)
- Replica Sacrificial Sphere
- 1x Matter Transubstantiator
- 2x Random Deceiver gear (198, no set bonus)
- 2x Exonium (crafting mat)
- 4 Ultimate Commendations
Basic Overview
Revan is a multi-phase fight that takes place across three distinct floors of the top spire of the Temple of Sacrifice. Revan is significantly more challenging on Hardmode difficulty with many new mechanics in addition to changes to raid mechanics that force a much higher level of raid coordination. Also, the DPS check on the fight is very tight compared to any other fight in the game, even the Ruugar burn of the Coratanni fight in Ravagers HM. This occurs at the same time as a raid wide awareness check. Overall, the fight is by far the most challenging in the entire instance and requires excellent play and understanding of mechanics from beginning to end.
Phase Division
- Phase 1: The fight opens on the first floor, fighting Revan to push him to 64 percent.
- Phase 2: After Revan is pushed, HK-47 jumps down from the ramparts. The raid pushes HK from 100 percent to 9 percent while periodically destroying waves of adds. At 9 percent, HK self-destructs and a pathway leading to stairs up to the second floor appears.
- Phase 3: The raid climbs the stairs to the second floor on either side of the room. Once on the second floor, the raid must destroy the four Machine Focuses to force Revan to reappear.
- Phase 4: Now the raid must fight Revan on the second floor to push him from 64 percent to 28 percent. Once at 28 percent, Revan teleports himself to the top floor and begins to channel Resonance, which begins a timer to a raid wipe. A set of rocks forming “stairs” to the third floor are also summoned, spiraling around the center beam.
- Phase 5: The raid must climb the rocks to reach the top of the tower. Once one person reaches the circle on top, the Boon of the Spirit will teleport all raid members to the top, including reviving the dead. The raid must then DPS down Revan’s shield in order to break his cast.
- Phase 6: When the cast is broken, the fight proceeds on the third floor. Now the raid must push Revan from 28 percent to 9 percent, at which point he jumps away to one of the broken walls on the edge of the tower and shields himself.
- Phase 7: Revan summons the Machine Core, which pulses with energy and threatens to disintegrate everything in its vicinity. This is the burn phase in which raid maximum health decreases over time, causing damage taken to become increasingly punishing until it can no longer be endured.
Boss Abilities (Revan)
| Ability | Damage Type | Damage Source | Damage | Cooldown |
| Heave | Internal | AoE | ~15k | 30s |
| Impel | Frontal | Avoidable | 20s | |
| Blade of Alek./Revan | Kinetic | Avoidable | ~2-4k per hit | 60s |
| Overcharged Dual Saber Attack | Elemental | Frontal | ~5-8k per tick | 15s |
| Essence Shear (Machine Focus) | Internal | AoE | ||
| Resonance | Kinetic | AoE | 4-5k every 6 seconds | |
| Force Aberration | Kinetic | Avoidable | ~10-20k | 73s |
| Unstable Aberration | Kinetic | Avoidable | ~4-5k | 32s |
| Consume Essence (Machine Core) | Elemental | AoE | 383 every 2 seconds |
Boss Abilities (HK-47)
| Ability | Damage Type | Damage Source | Damage | Cooldown |
| Pseudorandom Violence | Kinetic | Frontal | ~10-20k per tick | 14s |
| Shiv | Kinetic | Direct | ~10k | 4s |
| Shiv: Perforated Vitals | Internal | Direct | ~9k every 3s per stack | |
| Snap Shot | Kinetic | Direct | ~3-4k | |
| Leg Shot | Kinetic | Direct | ||
| Handful of Grenades | Kinetic | AoE | ~15-20k | 20s |
Mechanics
Heave
This is the main raid wide AoE. Whenever you fight Revan, he casts it immediately and then again every 30 seconds until you phase or end the fight.

Saber Overcharge
Saber Overcharge is Revan’s 180 degree cleave that grants him 2 stacks of Saber Overcharge (which last approximately 3-4 seconds), dealing massive damage to anyone in front of him. This ability is cast on all floors.


Impel
Impel (narrow red telegraph) is a forced infinite knockback on the main tank on Revan. It is not intended to force a tank swap, but the main tank must line up the red ground marker with one of the pillars around the edge of the room to avoid getting knocked into the pit.

Force Wield/Blade of Alek & Revan
When you see Revan casts Force Wield, he will summon his two swords Blade of Alek and Blade of Revan. These two spinning swords will follow two raid members around (their names will be announced in red text) and damage anyone that gets close. Fortunately in storymode you can knock these blades off the edge and don’t have to worry about them.
You will see these blades in Phase 1 and Phase 4.

Exploit Vulnerability
Exploit Vulnerability is used almost instantly by Revan whenever the player with primary aggro exposes his/her back to Revan. Exploit Vulnerability deals a massive amount of damage to the affected player.
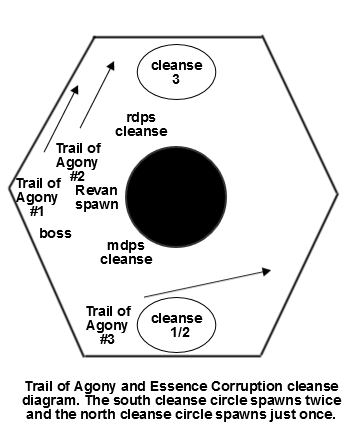
Trail of Agony
Trail of Agony is the tank swap mechanic on Revan, forcing the target of the cast to kite a series of fire circles which deal a small amount of damage and cause anyone who enters them to gain a stack of the debuff, which increases damage taken by 5% per stack. There are 6 fire circles for Trail of Agony on Floor 1, and only 5 on Floor 2 and Floor 3.

Essence Corruption
Essence Corruption is a cleansable DoT cast by Revan throughout Phase 1. Every cast, two stacks are sent out to the raid, appearing either as a stack of 2 on a single DPS or two individual stacks on different DPS. Each stack of Essence Corruption does a small amount of damage over time and reduces damage dealt by 10%. When cleansed, Essence Corruption spreads to the cleanser, in addition to all raid members within 5 meters of the afflicted target.

Malevolent Force Bond
Malevolent Force Bond is cast by Revan throughout Phase 1. It tethers two random non-tanks together, causing both to take increasing damage over time and preferring to choose either two ranged or one melee and one ranged. The bonded players must break their link on the center beam.
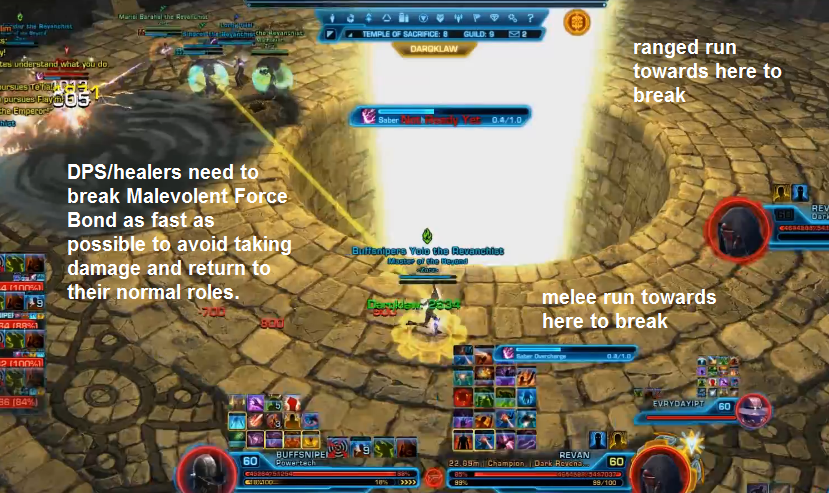
It also shows up as a stacking blue-ish debuff on the raid frame. You can see it in the right column here:

Shiv/Perforated Vitals
Hk-47’s primary attack on the tanks is an ability called Shiv. However, there is a potential tank swap mechanic here as well since HK applies a stacking debuff called Perforated Vitals. This stacking debuff lasts for 15s and is applied every 4s. This debuff will make the Shiv: Perforated Vitals DoT on the tanks tick much harder. At two stacks, you need to do a tank swap since 3 or more stacks of Perforated Vitals is very difficult to heal through.


Pseudorandom Violence
Pseudorandom Violence is HK-47’s conal attack, dealing an extremely large amount of damage in an infinite directional cone aimed at a random raid member. Each tick of the channel does an increasing amount of damage.

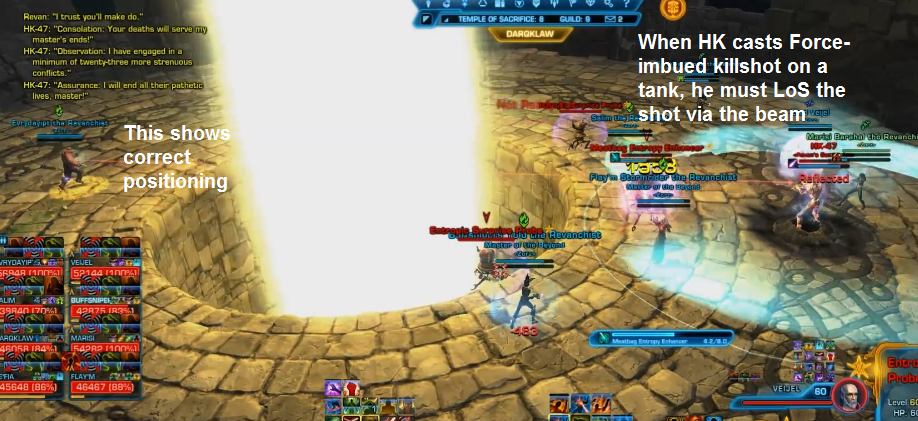
Force-Imbued Killshot
Force-Imbued Killshot is periodically cast by HK-47 throughout the fight, targetting whoever has primary aggro. Once targeted, it cannot be cancelled or changed unless HK-47 is defeated, so the person who has been targetted must LoS (line of sight) the attack around the center beam of the tower. If the attack is not successfully deflected by the center beam, the target instantly dies.
Reactive Shield/Invulnerability Field
HK-47 casts his Reactive Shield once at 75%. Once activated, any damage dealing abilities used from outside the shield will be reflected to the caster instead. The Reactive Shield remains in place until HK-47’s defeat.

Handful of Grenades
Handful of Grenades is cast repeatedly throughout the fight against HK-47. The cast affects the entire raid, spreading a single grenade onto each raid member. Each grenade will detonate after 4 seconds for a significant amount of AOE damage, also causing damage to any other raid members within 5 meters of the explosion. Grenades can be cleansed, leaving a red circle behind on the floor which deals damage to anyone standing in it when the rest of the grenades explode.

Meatbag Entropy Enhancer
Meatbag Entropy Enhancer is the self-titled cast from the lone Meatbag Entropy Enhancer droid which must be destroyed before it finishes the cast. Otherwise, this ability deals a very large amount of damage to its target and continues to deal massive damage until the Enhancer is destroyed.
Entropic Surprise
Entropic Surprise is used repeatedly by Entropic Surprise Probes starting 5 seconds after they spawn. Once this cast is interrupted, the Probe that casted it self-destructs. If the cast is not interrupted, the Surprise Probe deals a moderate amount of damage to its target and recasts.

Machine Focus
After you have killed HK-47 and have moved on to the second floor via the stairs, you will discover 4 pillars called Machine Focus that are resonating with damage. This AoE they are doing is called Essence Shear and the damage they do increases the longer they remain up (from 300 tick per second to 4k tick per second). You need to kill all 4 of them for Revan to show up for phase 3.They have 80k HP each for a total of 320k HP.

Machine Heartbeat
Machine Heartbeat is a passive effect applied by Revan on the tower. Whenever it starts, it causes the raid to be knocked outward after 15 seconds, then inward after another 15 seconds. This cycle persists until the phase ends. Note that once you reach the burn phase on the Machine Core, the timing does not restart from the main phase on the top floor. This starts once on Floor 2 when Revan comes out, and again on Floor 3 when Resonance is broken.
Force Aberration
On the Revan will summon 4 Force Aberrations that will roam the platform. These Aberrations are purple circles that occupy almost the entire width of the platform, leaving a very small space to get past them. You will need to avoid them in those phases. The cooldown on Force Aberration is 73 seconds so these last quite a while.

Resonance
Revan casts Resonance when he teleports to Floor 3 at 28 percent. Resonance provides Revan a shield which takes a substantial amount of damage before breaking. If the cast time of Resonance expires, the raid instantly wipes.

Boon of the Spirit
Boon of the Spirit is the buff provided to the raid when one raid member steps into the blue circle on Floor 3 after climbing up the rock staircase. It instantly resurrects all dead raid members and teleports everyone to the top.
Unstable Aberration
Unstable Aberration is cast every 32 seconds, summoning a set of four Unstable Aberrations at random fixed locations around the top floor. After a few seconds, Unstable Aberrations become deadly, instantly killing anyone who remains within their radius.
Starting 7 seconds after the cast, Unstable Aberrations start expanding in a random sequence, one every two seconds, and then detonate 7 seconds after lighting up, dealing damage and knocking back anyone who is not facing the Aberration.
Machine Core
Revan will vanish for the last time at 9% HP, leaving you to deal with a Machine Core with 2.2 mil HP. The Machine Core will apply a debuff called Essence Shear, reducing your maximum HP by 1% per stack. In addition, it has another buff called Charged Barrier that causes any attacks made from a range of greater than 5m to be reflected. Any attempts to leap to it will also cause you to get knocked back.

Your goal here is to kill the Machine Core before the number of Essence Shear stacks reach close to 100. The constant Consuming Essence AoE from the Machine Core hits for very little but becomes more difficult as your maximum HP is reduced. Furthermore, Revan continues casting Heave throughout the Machine Core phase, which eventually becomes unsurvivable without some sort of mitigation or cooldowns.
Strategy
Revan (Floor 1)
The first phase consists of the start of the fight until you push Revan to 64 percent. You will be fighting Revan in this phase and need to be aware of the following mechanics from Storymode.
- Heave
- Impel
- Saber Overcharge
- Blade of Alek & Blade of Revan.
Note that Impel is now different. Impel is a knockback mechanic which displays a line-shaped red telegraph on the ground. It must be properly aimed towards the pillars around the outer ring of the room or you will die. You can cheese this with Hold the Line/Hydraulic Overrides and nothing bad happens, which is a definite convenience with Vanguard/Powertech tanks.
Also there are at least four new mechanics in Hardmode:
- Exploit Vulnerability (backstab)
- Trail of Agony (tank swap)
- Essence Corruption (cleanse/plague)
- Malevolent Force Bond (tether)
To start the fight, the main tank needs to pull Revan at an angle or else use Hold the Line/Hydraulics Override to prevent being thrown into the pit by Revan’s first cast (Discard). Typically we have one tank aggro Revan and get tossed or Hydraulics, and then the other tank taunts off and holds Revan for the first cycle of mechanics, taking him counter-clockwise around the room. This choice is arbitrary since the room is symmetric in every direction. There will also be a very large extra damaging Heave immediately after the Discard although this is really no concern whether or not defensives are used, since healers can quickly top everyone back up.
The raid should stay stacked up whenever possible since stacking does not cause anyone to take extra damage and thus aids the healers. The raid group will follow the tank who is holding Revan around the room from pillar to pillar. Whenever Trail of Agony is cast, forcing a tank swap, it should be run along the outer edge and everyone in the raid needs to be careful to move away from it so that they do not also take increased damage. In particular, everyone needs to make sure to keep moving forward and following the tank and melee so that the raid does not take up excess space and make things more difficult for everyone.
The most frequent mechanic is Essence Corruption, which is cast on the DPS and reduces their damage dealt. It can be cleansed from players, but will spread to any nearby players when cleansed. To handle this, we have DPS immediately leave the stacked group whenever they receive one or more stacks of Essence Corruption. Our healers usually call out who has these debuffs in voice comms. It is not necessary to run extremely far away, especially if you are a melee and need to keep doing some DPS, but you need to be at least more than 5 meters away from anyone else. In general, for when people need to be cleansed, we assign ranged to go backwards (away from Revan) and melee to strafe to the side ahead of the group.

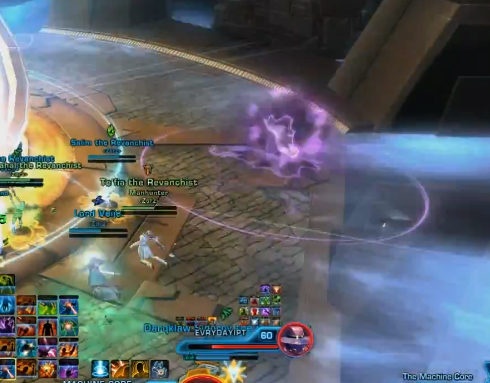
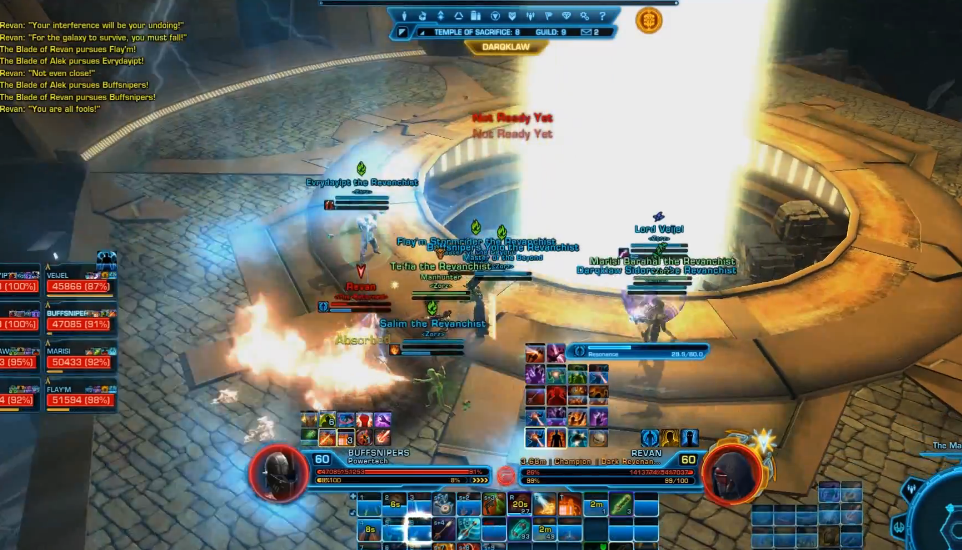
For example, here is a Powertech DPS standing out to the side for a cleanse just ahead of Revan:

Healers collect stacks of Essence Corruption from the raid until they can cleanse them in a circle along the edge of the room. There are three total cleanse circles that spawn: one while fighting Revan, and two additional ones shortly before Revan is pushed to 64% and dissapears. Since over time, the DoT component of Essence will become increasingly more difficult to survive, it’s essential the healers use these circles. We like to have one healer (often the one with the worst cooldowns) cleanse themselves at around 4 stacks of Essence Corruption by using the first circle nearby the raid group.

Then both healers will cleanse with the new circles that spawn right before HK-47 comes down. Typically with solid DPS, one healer will have 3-4 stacks (the one who cleansed already) and the other will have anywhere from 6 to 8 stacks. Note that players with Essence Corruption must take care not to accidentally run in these cleanse circles which are needed by the healers at the end of the phase.
Otherwise, random DPS and healers can be periodically called upon to break the Malevolent Force Bond tether, which deals an increasing amount of damage over time to the two players bound by the tether. This can be broken by having the two players run on either side of the center beam, snapping the tether in half with the raw Force energy. It is important that everyone reacts quickly to this and does not force the other person to run all the way around just to break the tether.
Again, we tend to have melee DPS run around the center on the side close to Revan, and the ranged on the side far from Revan. Healers generally go the opposite direction of the person they are tethered to. So if they are bonded with a melee, they would act like a ranged DPS and vice versa. This mechanic can also be placed on two ranged or two healers, for example, in which case they should coordinate with one another.
Tanks: Tanking the first phase is rather simple and only involves a bit of practice with the timing of the mechanics. Recall that we move Revan counter-clockwise around the room. The tank with primary aggro on Revan has a few responsibilities that you should keep in mind:
1) Keep Revan pointed away from the raid group when he does his Saber Overcharge cleave. Since the cleave comes fairly often on a 15s cooldown, it’s generally just a good idea to not turn him towards the raid at all. We keep Revan pointed towards the outside whenever possible.
2) Do not turn your back to Revan at any time since he will instantly interrupt his rotation and hit you for an extremely large amount of damage (nearly a one-shot on 8 man, and a one-shot on 16 man) . Yes, backpedaling is encouraged! You can also left/right strafe if you do so carefully.
3) Get knocked back into the next unused pillar around the room every time that Impel is cast so that you don’t die to the knockback. Note for Vanguard/Powertech tanks: if you don’t have enough time to position for “impel” hit Hold the Line/Hydraulic Overrides and you won’t die. Also, for Guardians/Juggernauts and Vanguards/Powertechs: as Impel casts, if you spam a leap, you’ll jump back to Revan mid air.
The off tank with Trail of Agony should kite it in an efficient manner that does not spread circles all over the place. We tend to kite the first two Trails along the edge in the opposite direction that the tank is moving, generally alongside or behind the group. Then the third and final Trail is kited ahead of the main tank in the same direction that the group is moving. See the above diagram and also note that you can CC break during Trail of Agony in order to use movement-based abilities such as Force Speed and Hold the Line/Hydraulic Overrides.
If you get more Trails than this, you will have to start being more creative, but your DPS is slow. Otherwise, just DPS with the group and watch for the next Trail of Agony cast to taunt the boss.
DPS: Your responsibility is to push Revan as fast as possible so that the healers do not have to take too many stacks of Essence Corruption. You also need to move quickly out of the group into a clear spot every time you receive stacks of Essence, as well as back into the group for AoE heals once you have been cleansed. Try to be as helpful as possible with knocking Blades off the edges whenever they spawn, if you have a knockback available, and call out your knockbacks in voice comms so that you do not end up with blades that were not properly dealt with or that multiple people tried to knock at the same time.
Healers: This is one of the more hectic phases of the fight to heal, but it’s a lot of fun and you have some big responsibilities. The most important thing is managing Essence Corruption. You need make sure that you are cleansing each new person as quickly and efficiently as possible so that you don’t fall behind on cleansing. In addition, you must be sure that you will not accidentally spread it, since it becomes very difficult to recover a pull once it starts infecting everyone.
Have a strategy to cleanse Essence Corruption. In Zorz, we use the following two rules:
1) Healer #1 cleanses from top to bottom while Healer #2 cleanses from bottom to top.
2) If anyone needs two cleanses, Healer #1 goes first, followed by Healer #2. If you don’t do this, only one cleanse will work, but the cleanse cooldown will be activated for both healers which will cause you to fall behind.
While DPS should be careful where they stand, we believe it is the healer’s responsibility to ensure they do not spread Essence Corruption to others. So the healer should ask the DPS to move if they are not in fact clear of other people. Also, rotate cooldowns and extra healing on yourself as you get to 5-6 stacks so that you do not die to a Heave or similar mechanic since you will start taking a lot of damage from the DoT component of the debuff stacks that you collect.
Otherwise, most raid damage comes from Heave and Malevolent Force Bond, so most healing will be on the tanks. In particular, you need to focus heal the main tank when he is blasted by Revan’s Saber Overcharge cleave, as well as give extra heals to the tank kiting Trail of Agony, who is liable to die if not mostly topped off when the Heave hits. Remember that Heave is an internal damage hit so the tanks are getting hit for the same amount of damage as everyone else, and Trail of Agony stacks only increase that by a linear amount.
Unless you are desperately behind on heals, do move with the other heals/DPS for Malevolent Force Bond to break it quickly and try not to turret heal since forcing DPS to spend a large amount of time away from the boss or out of their rotation slows down the phase and actually makes healing even worse and forces you to keep taking more Essence Corruption. Very rarely will moving a few steps cause you to be unable to keep everyone alive.
HK-47 (Floor 1)
The next phase begins when Revan disappears and summons HK-47. All of the Storymode mechanics still exist, but are much more punishing and do not tolerate being ignored.
- Pseudorandom Violence frontal
- Shiv attacks and the associated Perforated Vitals debuff on the tanks
- Handful of Grenades every 20s
- Invulnerability Field past 75% HP
One key new mechanic is Force-Imbued Killshot, which is cast periodically on the main tank and lasts for 6 seconds. By the end of the cast, the tank must line of sight HK-47 using the center beam so that the shot is diffused by the Force energy.
In addition there is another new mechanic (Meatbag Entropy Enhancer/Entropy Surprise Probes) which consists of a set of four droids, which can spawn sometimes at the same time as Killshot and/or Handful of Grenades.
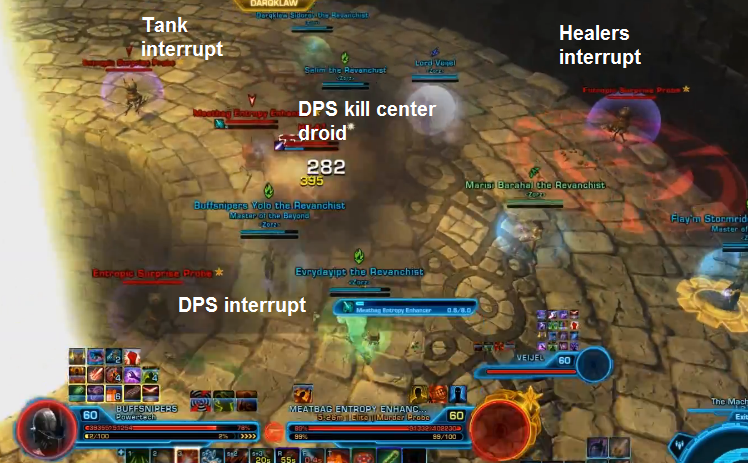
As indicated in the picture, we have both healers interrupt the one along the outer edge (since healer interrupts can miss this ensures we never die to this). The tank that does not have to run Killshot to the other side takes care of another interrupt. Finally one of the DPS is assigned to get the last interrupt.
Grenades hit much harder in Hardmode and must be taken seriously. Since tanks take a lot of damage in this phase and also may be responsible for running Killshot and thus cannot afford to be knocked down, we have them position on the inner rim when Handful of Grenades is cast. Then each healer is assigned to cleanse a specific tank.
Tanks: After pushing Revan to 64% HK will shortly come down from his perch. He will initially cast “Pseudorandom Violence” and not react to taunts. After he finishes his cast a tank can taunt him and hold him towards the middle of the inner circle and outer ring.
Tanks will be responsible for handling the Force-Imbued Killshot mechanic which requires the tank with aggro to run opposite of HK and place HK and the beam he targets on said tank through the yellow beam in the middle. Failure to properly do mechanic will result in a one shot and most likely a wipe unless a battle rez is quickly available. Tanks will also need to get one of the interrupts on the “Entropic Surprise Droid” which will cast the ability you need to interrupt about six seconds after they spawn.
Make sure you hold aggro and taunt aggressively, or someone else can end up with the first Force-Imbued Killshot. This position is key to give DPS room inside his shield once he casts “Reactive Shield”. While tanking HK a tank will receive a stacking debuff of Perforated Vitals from his Shiv attack and tanks should swap at two stacks or else every other Pseudorandom Violence cast.
Here are some additional tips:
- Do as much damage as possible to the Meatbag Entropy Enhancer instead of sitting on your interrupt.
- Taunt HK if you aren’t the tank running Force Imbued Killshot to keep him as stationary as possible.
- Swap guard to target that the Meatbag Entropy Enhancer is targeting.
DPS: For most of the phase you simply fight HK inside his Reactive Shield. Be careful not to do damage from outside it, since it will reflect onto you. When grenades are thrown out, if you can cleanse yourself, do so along the outer rim, and try to stack your cleanse on top of other DPS in order to save space. Here is an example of DPS circles which are cleansed correctly along the outside, but are not stacked. This makes positioning harder for the healers and tanks.

Otherwise, wait for your grenade to explode outside the Reactive Shield and away from any other players. When HK deploys his droids, use the biggest burst rotation possible on the Meatbag Entropy Enhancer to kill him before he finishes his cast. Make sure to swap quickly onto this droid and not accidentally target HK or the other droids.
Healers: This is one of the more difficult phases in the fight to heal since the raid will take some grenade damage (unless everyone can cleanse themselves), some people will take some ticks of the Pseudorandom Violence cleave, and tanks will also be taking very large amounts of damage from Shiv and Perforated Vitals. Ideally you should have most of your cooldowns up coming out of Phase 1. When both tanks are at 2 stacks of Perforated Vitals, this is usually a good time to burn through all your energy and pop your energy regen talent.
Generally you should be single target focus healing tanks while they have 2 or more stacks of Perforated Vitals, and AoE healing the raid back up from any splash damage once the stacks fall off. If you fail to top the raid back off, people are at risk of dying to a missed interrupt on the Entropic Surprise Droids or from a hit from the Meatbag Entropy Enhancer.
Revan (Floor 2)
To get to the second floor, you must climb the stairs that forms when HK-47 is defeated. The safe route is marked with arrows and does not require much jumping.

You will need to destroy the 4x Machine Focus on the second floor to spawn Revan.
Just like on Storymode, you will need to push Revan down to 28 percent in order to get him to teleport to the third floor. The challenge in Hardmode is that in addition to the purple roaming Force Aberrations on this floor, as well as Revan’s normal attacks, you are faced with several key mechanics:
- Machine Heartbeat
- Trail of Agony
- Blades of Alek/Revan
The most challenging aspect of this floor is that you are introduced to Machine Heartbeat, which is a physics mechanic and can be resisted by Hold the Line/Hydraulics Override and Hunker Down/Entrench. You will see this animation when you do Storymode, but it does nothing in that case. For Hardmode, the Machine Heartbeat repeats every 15 seconds, starting with a push out, then continuing with a pull in, and so on. This means everyone in the raid must be aware not to get knocked off the edge.
The Trail of Agony is identical to the first floor except now you will drop five circles instead of six. This forces a tank swap just like on floor one, but positioning for Trail of Agony is somewhat more challenging since you must be aware not to get knocked off the edge by the Machine Heartbeat while you kite Trail of Agony.
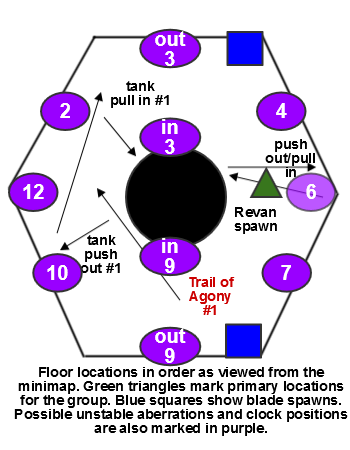
The best way to approach this floor is to develop a strategy for where you want Revan. To start, you need a good idea of the Force Aberration pattern, so we’ve provided an animation:

The Force Aberrations start in the east and west so do not be standing there when they spawn. They proceed through a fixed pattern and then despawn after a full cycle, at which point Revan casts Force Aberration again and everything repeats. You should be ready to push Revan by the time he casts Force Aberration if you hope to have enough DPS to push the fight. If Force Aberrations respawn and you are still burning him, your DPS is too low.
The essential idea that can be used is that North/South positions will be clear of purple on the outer edge when you need to be knocked out, and the East/West positions will be clear of purple on the inner edge when you need to be knocked in. One tank will take Revan along to the next position depending on whether it is a pull in or out. The other tank who is not on Revan kites Trail of Agony. These roles are swapped every Trail of Agony cast just like on floor 1. For the first two Trails, the tanks kite Trail of Agony around in the opposite direction as the raid group moves, taking care to be on the outer edge for the pull in. The timing always dictates that a pull in happens during or just after Trail of Agony, so you will never be pushed outwards while kiting. Thus, kite along the outer edge to be safe.
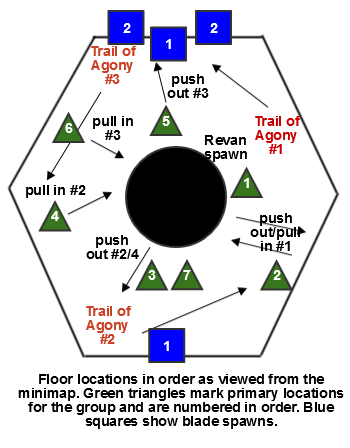
The picture above depicts all locations that we use according to the minimap. For extra clarity with respect to Force aberration locations, see the following video for the Zorz strategy. This video refers to the “tank” as the one with aggro on Revan (and his position is marked by “REVAN”) and the “offtank” as the tank currently free, usually returning from kiting Trail of Agony. We should definitely add that we offer only one strategy which worked well for us during progression.
There are some different and particularly more melee friendly ways to do this, so please search on Youtube for other HM Revan kills if you want some examples of how other guilds have approached this. Also, this video shows a “cheese-free” way to do Floor 2. Note in our kill videos, we use a variety of extra tricks like Hydraulics, Force Leap/Storm, and Phase Walk to shortcut some of the movement and positioning.
It is also crucial here to handle the Blades of Alek/Revan correctly so that they do not end up sitting in the raid group. For the first set of blades, we assign one DPS each to a knockback and knock the Blade of Revan off, followed by the Blade of Alek so that there are no accidental knockbacks. Other DPS/healers can serve as backup in case of a mistake. Just be careful that you will not get pulled in or pushed off the edge by Machine Heartbeat when trying to do knockbacks. The second set of Blades that spawn can be safely kited or simply knocked away while pushing Revan to Floor 3 and require no special attention.
Also be aware that there are still issues with invisible blades that teleport back up to the platform after being knocked off because they did not land cleanly in a pit and instead hit some platform below. If this happens, you will need to knock them off again.
Finally note that the main tank on Revan should always be facing him away from the group, just like on Storymode, since he continues to do his Saber Overcharge 180 degreee cleave every 15 seconds. This deals a large amount of damage and cannot be pointed at the raid or they will probably die from Heave damage. The positioning for our strategy has been designed to prevent the raid from getting cleaved when it is done correctly.
There is a trick that allows you to get the maximum burn to make the third floor as fast as possible, provided you are able to push him within the first set of Force Aberrations. If your DPS is high enough, you will likely get Revan to 30 percent quickly. Hold DPS at 30 percent and kite Revan along to a safe position. Wait for the Heave cast, then have the entire raid cast as many DoTs as possible and throw DPS grenades on Revan. This will come close to pushing Revan, but not quite. As soon as Revan starts casting Force Aberration for a second time, he is still vulnerable to damage but cannot teleport to Floor 3 until he is finished casting. If you do not use this trick, Revan will typically have about 1.5 million health when you break his Resonance shield on floor 3. But with this trick, you can get Revan as low as 1.1 to 1.2 million, which is a considerable time savings for floor 3.
Tanks: Tanks have the most demanding role by far on Floor 2 and must understand both roles on where to kite Revan and where to kite Trail of Agony without ever dying to the Force Aberrations or to the Machine Heartbeat push in/pull out mechanic. Review the information in the section above, as well as our tank strategy video narrated by one of our main tanks, which is listed in the “Advanced Strategy” section at the bottom of the guide.
DPS: Once all of the Machine Focuses are down and Revan is out, you need to just move along from position to position with the rest of the group and try to push Revan as soon as possible. This is a very straightforward burn that mostly tests your ability to keep up with your rotation while being pushed and pulled across the platform and helping with mechanics like the Blades of Alek and Revan.
Healers: This floor is only extremely challenging to heal if positioning mistakes are made, typically by the tanks but sometimes by people getting clipped by Force Aberrations or walking in front of Revan. Also, if the blades are not knocked off correctly, things can become very difficult quickly since the raid tends to naturally stack together. The general pattern is to splash AoE heal small periodic damage while focusing on single target heals every time Revan casts his Saber Overcharge cleave on the main tank. Don’t underestimate the damage of the cleave on this floor since it is quite considerable, dealing up to twice the tank’s total health in damage and therefore requires proactive healing. You will also need to help the recover the raid’s health after each Heave. The Heaves hit every 30 seconds timed just before the push out (which also repeats every 30 seconds) so this damage is predictable. Finally, you will need to make sure that the tank kiting Trail of Agony does not die to Heave since they will take extra damage.
This may sound like a lot to keep up with, but most of the damage comes in waves so it is not too bad and it will seem easier with practice. At that point, your goal should be to throw in as much DPS as possible in order to push the boss quickly, especially at the start and end of the floor where healing is less relevant.
Revan (Floor 3)
To get to the 3rd floor to finish the encounter, you need to have at least one raid member climb. This person begins by entering the portal that normally teleports everyone to the top on Storymode. This no longer occurs. Instead, it teleports you onto the stone stairwell that forms around the center beam. No longer do you get a free ride to the top!
The safest way to handle this is to choose 1 to 2 people who are particularly good at platforming and/or have good gaming rigs that do not suffer framerate issues while looking at the particle effects of the center beam. Be advised that it is highly likely all raid members will be required to climb on Nightmare mode, so do not get too accustomed to having someone climb for you! Once those people reach the top, the circle on floor 2 will now teleport anyone who steps in it to the top like Storymode, in addition to resurrecting the dead. This is the Boon of the Spirit.

Once Revan breaks his Resonance cast, you are in a burn phase that essentially lasts until the fight. The reason the burn starts early (before the Machine Core) on Hardmode is that it can be very difficult to keep the tanks alive if your raid cannot push Revan before the second Trail of Agony. It is generally a good idea for this reason to pop all adrenals and class buffs immediately to get to the Machine Core as quickly as possible. While the Core phase is long, there is a lot less damage going out than when the tanks have to deal with Revan. For this reason, we also try to push Revan at the optimal moment on floor 2 to reduce his health as much as possible for beginning floor 3 (see the previous strategy section).
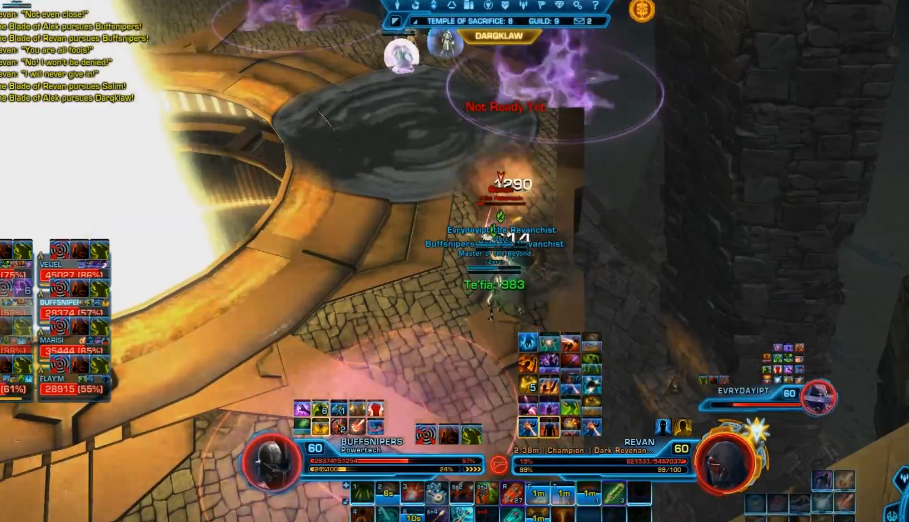
This is our starting position on Floor 3:
The Machine Heartbeat pull in/push out mechanic is again present on this floor, starting 15 seconds after Resonance breaks with the first push out, just like on Floor 2. In addition, the Blades of Alek/Revan spawn in the northeast and southeast corners. Generally we send a healer with a knockback to push the northeast one off through the gap so that it does not come into the group, which is positioned close to its spawn. The other healer should remain and heal the main tank and the group. The healer doing the knockback needs to be careful not to get knocked off by Machine Heartbeat while doing this. Either use Hold the Line/Hydraulic Overrides to run back to the group after knocking off the blade or get knocked into the southwest corner pillar.
Meanwhile, the southeast blade will spawn on the first tank who takes Trail of Agony, provided this tank is the closest raid member to the spawn point. This means the tank can simply kite the blade all the way around the ring back to the group to be knocked off after the first set of Unstable Aberrations. Note that unlike on Floor 2, you need to be worried about being knocked outwards, rather than pulled in, while kiting Trail.
Here is our diagram for this phase up until Revan is pushed and the Machine Core spawns:
This brings us to the main mechanic for Floor 3. Every 32 seconds, a set of four purple circles (Unstable Aberrations) will spawn in static locations. Although they look a lot like the Force Aberrations on floor 2, they do not move. If you step inside these circles at any time, you will take a large amount of damage or even die. We denote the locations of these circles by a clock system, rather than cardinal direction. We use the initial position of the raid group on the east side of the map as 6 o clock. The following picture shows how we label them:

After five seconds, the circles will all start to “glow”. Then every two seconds, the “glow” will expand into a state that we call supernova. Then, just two seconds after all circles have lit up, the Unstable Aberrations will start exploding in the order in which they lit up, at a rate of one explosion every two seconds. Each explosion delivers a knockback to any player not facing directly towards that circle, in addition to unavoidable damage.
This player is correctly facing the explosion:
The first set of Unstable Aberrations spawns just before the Blades of Alek/Revan and the push out:

Note that 6 lights up first:

Outer 9 lights up next during the knock out:

Now while the others light up, the melee/tanks align with the first one at 6:
Notice in the last picture how tanks/melee DPS, who have mostly instant moves, can easily align their characters to do additional DPS on Revan. If you do not do this, you cannot use any GCDs on Revan since it can turn your character in the wrong direction. So, ranged are not generally able to do this due to having to manage their casts.
The challenge of Unstable Aberration is that the game is very sensitive about positioning. Many of the abilities that you use will turn you towards your DPS/healing targets. You can use non-targetted AoEs, however, e.g. Explosion Surge/Flame Sweep for Vanguards/Powertechs. In the healer section below, we will outline what abilities you are allowed to use and how to heal while dealing with these Unstable Aberrations.
Although all raid members should learn to recognize and deal with the Unstable Aberration patterns, while your raid group is progressing it can be helpful to have a strong raid leader, or anyone particularly good at the Unstable Aberration mechanic, call out Unstable Aberration positions as they light up. This lets everyone else focus on their rotation and positioning for the Machine Heartbeat in/out mechanic. So ideally this person calling out Unstable Aberrations should be a tank, who has the most straightforward job and contributes the least to the kill from this point on. We compiled examples of our main tank Smugglin calling out Aberrations from some of our progression pulls in various Zorz groups.
This is a large personal responsibility check so do not be too frustrated at first since it typically takes dozens of pulls for everyone to master it. It is very important that you put emphasis on learning to do the mechanic efficiently and correctly before pushing maximum DPS. It is much better to wipe on the Machine Core at 50% with everyone alive because they have learned what to do, than to wipe repeatedly early because everyone is trying to push max DPS. Remember, the only players who absolutely have to do something during Unstable Aberration explosions are the healers.
Tanks: Tanking on the top floor can be an intimidating job since you have to manage Revan and/or Trail of Agony, along with the Machine Heartbeat in/out mechanic and the first set of Unstable Aberrations. The following picture shows how our tanks normally handle it:

We have the first tank take Revan at the start. The second tank will back away from Revan towards the inner 9 o’clock position and taunt during Unstable Aberration. Revan’s next cast will be Trail of Agony and he will not move around in the meantime so this does not inconvenience the raid. This puts Trail of Agony on a tank who is already on his way in a good place to kite the Trail circles and allows that tank to quickly return to the group for healing. Then the first tank taunts back during the Trail of Agony cast and prepares for the push out. It is important not to accidentally get backstabbed by Revan during the push out, so watch your character’s position carefully.
The tank with Revan should be pivoting him to face each Unstable Aberration as they explode. This allows you to continue putting GCDs onto Revan, as well making it easy for the melee to do so as well. He will not cleave anyone during this first set of Unstable Aberration explosions, since the first cleave comes before them, and the second cleave comes after them.
The tank with Trail of Agony needs to pop pretty much all of their defensive cooldowns to survive while away from the healers. You can pop a minor defensive just as Revan casts Trail of Agony on you, and then everything else as Trail ends and the Unstable Aberrations start exploding. You should kite around the inner ring so that you are knocked out safely, and then beeline back to the group. Unless you are fast, while you are running back to the group you will have to turn and face Unstable Aberrations. If you have difficulty running while facing them correctly, stand still and do it, but you need to at least get close enough while doing this that you can receive heals.
DPS: Your job is to push Revan as fast as possible in order to end his series of punishing mechanics. This means opening with your maximum DPS rotation until the first set of Unstable Aberrations, and then pushing Revan quickly after the first pull in. Generally you can continue to DPS safely until around when the 3rd Unstable Aberration lights up, at which point you either need to align yourself with the first Aberration which is to explode, or stop activating GCDs on the boss.
Heals: The key is surviving the first wave of mechanics in order to get to the Machine Core, which is somewhat easier to heal. Extra heals need to be directed to the far tank that runs Trail of Agony first since they will be briefly out of heal range and are at risk of dying to the first Heave since they have Trail of Agony stacks and also suffer Unstable Aberration damage. Raid-wide heals will also be needed just after the raid gets pulled in after the first set of Unstable Aberrations explode, since a Heave hits at the same time.
HEALING DURING UNSTABLE ABERRATIONS. You will quickly notice that you cannot skip all your GCDs during Unstable Aberration explodes like the DPS. We break down what to do by healer type since strategies must inevitably vary. Do note that you need to aggressively use all heals up until around 2 seconds before the first Aberration explodes. It’s only just as they’re about to explode that you need to be careful.
Scoundrels/Operatives:
- These healers generally have it most difficult since all of their single target casted heals turn their character towards the target. You will want HoTs rolling on the raid before Unstable Aberrations start.
- Kolto Waves will fixate your character towards where you are channeling it. You can still use Kolto Waves by positioning yourself between the group and an Unstable Aberration explosion, but you need good timing.
- Use Emergency Medpac/Surgical Probe, Kolto Cloud/Recuperative Nanotech, Slow Release Medpac/Kolto Probe safely. Note that applying a Slow Release Medpac/Kolto Probe during Unstable Aberration explosions is generally inadvisable since they do not tick immediately or provide you any burst healing.
Mercenaries/Commandos:
- Kolto Shot, Bacta Infusion/Emergency Scan and Kolto Bomb/Kolto Missile are the only heals which will turn your character. Do note that Kolto Shot and Emergency Scan can be used on yourself safely.
- Since Kolto Bomb/Kolto Missile is so useful for raidwide healing during Aberrations, you may be interested in how to use it anyway. Right after an Aberration explodes, you can activate the GCD and it will briefly turn you towards the direction it faces. The trick is that you can throw your Bomb/Missile in the general direction of the next explosion and be 100% safe.
- Successive Treatment/Progressive Scan is your powerhouse smart heal that is very useful right after a Heave and/or during Unstable Aberration explodes. It can be channeled safely while turning your character and does a massive amount of healing.
- Medical Probe/Rapid Scan is fast enough that you can get them off on people after turning for each explosion.
- Tech Override/Power Surge can give you an instant heal, so if you feel nervous about casting your longer Healing Scan, this is a great way to get one off. You can also do Bacta Infusion/Emergency Scan on yourself, then get an instant Advanced Medical Probe/Healing Scan on someone else.
Sages/Sorcerers:
- The good news is these healers are excellent and have very few heals that are dangerous to use. Overall the Sage/Sorcerer may be one of the strongest healing classes on the top floor.
- Use Force Armor/Static Barrier on the raid before each Heave, and if possible, reapply it during Unstable Aberration explosions to anyone low on health.
- While Revivification is fairly weak and slow, this can actually work to your advantage since you can precast it 2 or 3 seconds before the Unstable Aberrations explode and it will still be working for you.
- Your instant Wandering Mend/Roaming Mend is amazing to use after the Heave hit or during explosions. It can even be done midair if you are being pulled.
- The only dangerous heal you have is Healing Trance/Innervate, and you can just use this on yourself safely. It’s possible to align yourself between a raid member and an Unstable Aberration to use this skill, but it is not recommended.
Machine Core (Floor 3)
Now everything simplifies because you must no longer handle Revan, but the Machine Heartbeat and Unstable Aberration mechanics are still present. The Machine Core’s large size can make it difficult to see some of the Unstable Aberrations so you need to be aggressive with adjusting your camera angle if this becomes a problem.

As you fight the Machine Core, you gain stacks of Essence Shear which are applied every 2 seconds and reduce your maximum health by approximately 1 percent per stack. The only damage the raid suffers is a very small ticking damage, along with a Heave every 30 seconds, and the damage from Unstable Aberration explosions. Since you will need to take on many stacks of Essence Shear in order to defeat the Machine Core, this is a tight burn phase.
The Machine Core has 2.2 million health. If your tanks each do 150k damage (in our experience, they can actually do more than this), and each healer does 50k damage (during downtime between Heaves/Unstable Aberrations), then the DPS need only burn 1.8 million health. This means each DPS must average 450k on the Core in order to the beat the fight. We have found that DPS using Hold the Line/Hydraulic Overrides to avoid having to run out for the pull in can do between 500k and 700k, and non-cheesing DPS can do anywhere from 350k to 550k, so this is possible. Note the upper ends of these DPS ranges are typically with a 198 mainhand already, so if you are in less gear you may have 80+ stacks of Essence Shear when you beat the fight and only pull 400-450k DPS a piece.
The most important factor in defeating the boss is keeping all 8 members of your raid group alive through the Machine Heartbeat and Unstable Aberration mechanics. While it is still possible to fail with low DPS or heal output with everyone alive, it will be almost impossible to finish if 2-3 people die early on due to these positioning mechanics.
Heave timing is determined with respect to Unstable Aberrations and will not change. We have provided a diagram which shows when the Heave and the pull in/out fall with respect to Unstable Aberrations.
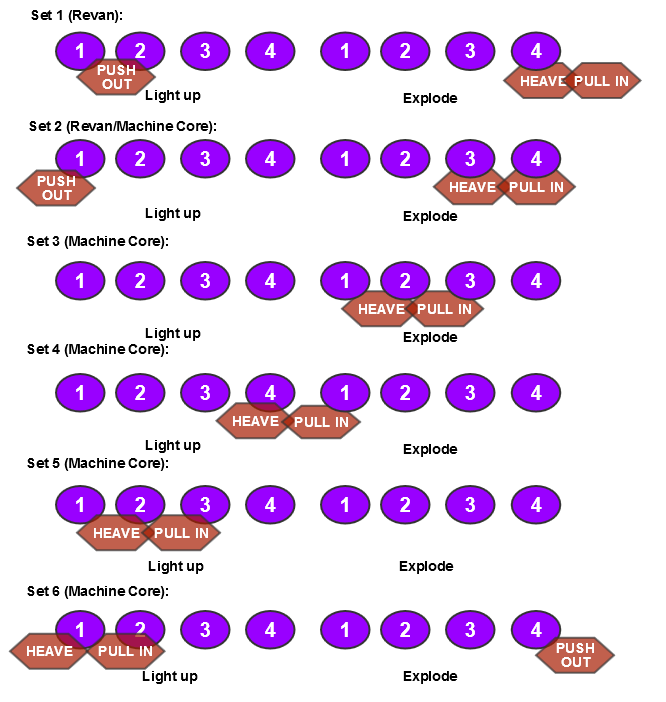
For each pull in, raid members should either pop Hold the Line/Hydraulic Overrides to resist the pull, or else run away from the Machine Core to the outer edge a few seconds ahead of time.
Note that starting at 60+ stacks, you are advised to use some defensives with the Heave since it can be difficult to survive. For example, look at raid health after the 65 stack Heave:

Tanks: You are essentially a low caliber DPS at this point. You should likely be responsible for most of the raid call outs and coordination since you frankly matter the least now. However, it’s still important to stay alive since a tank can do up to 250k on the Machine Core which is not insignificant.
DPS: Stay alive! If any DPS die – even if you can battle rez them – the DPS check is much tighter. So while you need to do as much to the Core as possible, you should never risk using extra GCDs instead of facing Unstable Aberrations unless you’re running out of time and at high stacks. Otherwise, you should be cycling minor defensives each round of mechanics and be ready with a medpac if you get extremely low during Aberration explosions or after a heave. Do not use any defensives during the downtime between Unstable Aberrations since the healers can easily AoE heal the minor ticks from the Machine Core.
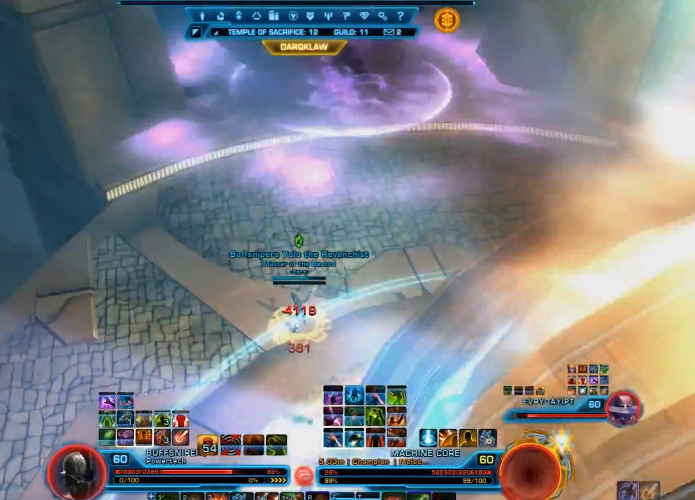
If your DPS output is low you will need to find opportunities to put more DPS on the Machine Core. Note how your character automatically faces the Machine Core while you attack it:
So, just like DPS can align with Revan before the Machine Core phase, it is possible to align yourself to put the Machine Core between you and the next Unstable Aberration to explode. If 2 or more Unstable Aberrations are oriented behind the Machine Core then this is a way you can do some DPS regardless.

Heals: Your main job is doing burst heals on the raid just after each Heave so that people do not die to Unstable Aberration explosions. The first Heave will come at the end of the explosions, and shift upwards so that it happens during the explosions, and then before them. So you should be ready with your biggest heals and cooldowns each time this occurs. You will have to survive anywhere from five to seven sets of Unstable Aberrations to beat the fight. After each set of explosions, top off the raid and then throw a few DPS moves on the Core.
Generally we find it easiest for healers to stand on the outer ring once Unstable Aberrations start lighting up. This makes it so they don’t have to worry about the pull in (or even hitting Hydraulic Overrides) and can focus on doing the mechanics correctly while executing a few healing GCDs. If you have a Sage/Sorcerer healer, they can apply Force Armor/Static Barrier to the raid in the seconds leading up to each Heave. This can allow the raid to potentially survive as high as 90 stacks, although by 80 stacks the Sage/Sorcerer healer will find it difficult surviving the Unstable Aberration explosions, which hit Sages/Sorcerers for upwards of 6k a hit.
The End
We’ve now come to the end of the guide, so if your raid group has made it this far, then you should be very proud of yourselves for downing some of the most difficult content that this game has ever seen. Revan in particular is a very rewarding boss to master, and now you can collect your shiny Revanite mainhand weapons!
Please review some of the class tips below, along with our strategy and kill videos in the bottom sections. Thank you for reading our guides for this tier and best of luck in Hardmode Ravagers and Temple of Sacrifice! As always, feel free to comment or contact us if you have questions, and we will be revising our guides over time with corrections as much as possible.
Class-Specific Tips
Note that the number of useful tips for this fight, due to its length and complexity, is almost innumerably beyond the comprehension of the author! Please forgive the many omissions; the author has compiled only a list of some of the most useful tips encountered in our raids.
Guardian/Juggernaut
- For HK-47’s Force-Imbued Killshot, Guardian/Juggernaut tanks have it most difficult and must react quickly since it is not realistic to put someone on the other side to Guardian Leap/Intercede to. Take the talent for a speed boost when using Endure Pain/Enure. Use this if you have to run the Killshot during HK. Without this talent the timing to run to the proper position is far too tight to be comfortable.
- During the Machine Core burn, particularly as the Essence Shear stacks grow above 50, use Guardian Leap/Intercede to leap to an ally without a good cooldown just before a Heave.
- Enure/Endure Pain can be used to slightly increase your health during a difficult moment in the Machine Core burn. Unfortunately, you will only gain a little bit of health since this is calculated as a percentage of your total health, rather than your original HP pool. However, even a few thousand extra hitpoints can make the difference between living and dying.
- The Guardian/Juggernaut AoE taunt shield should be used when possible to mitigate heave damage or accidental cleaves on the group. Although it mitigates less damage than the Vanguard/Powertech taunt, it does not require the group be stacked on the boss to gain the benefit, making it more flexible. It is also usable on floor 3, and should be used on higher stack heaves to help potentially survive one more heave rotation than normal.
- Heave can be Saber Reflected. If necessary, on the first and second floor this can be used to mitigate a heave when kiting trail of agony far from the healers. Use this also on the third floor, both for kiting Trail of Agony while pushing Revan, as well as for Heaves at high stacks of Essence Shear while burning the Machine Core.
Sentinel/Marauder
- When HK casts Handful of Grenades, use Force Camouflauge both to move out of HK’s shield and to take significantly less damage from the explosion.
- During the HK-47 phase, Transcendence/Predation can help an ally get to the other side of the beam for Force-Imbued Killshot in a pinch, but is otherwise quite dangerous in this fight so use with extreme caution.
- Force Camouflauge, Saber Ward, and Guarded by the Force/Undying Rage can all be cycled to take very little damage in the Machine Core phase, even from very high stack Heaves and Unstable Aberration explosions.
Sage/Sorcerer
- You can cleanse yourself of the grenade during HK phase.
- Even if you are a DPS, use Rejuvenate/Resurgence and Force Armor/Static Barrier on yourself or other people during breaks between phases, including climbing the staircases from Floor 1 to 2, as well as Floor 2 to Floor 3.
- If you do not have a Sage/Sorcerer healer, Sage/Sorcerer DPS should use Force Armor/Static Barrier frequently if a raid member is low on health and a Heave is coming up. Your time is very limited on the top floor, but you can actually do this while standing out waiting for the pull in during the Machine Core burn since you will not be doing anything for a few GCDs anyway. This can help anyone survive at high stacks of Essence Shear and is highly encouraged.
- It is worth considering not using your raid wide buff at the start of Floor 3 or the Machine Core, because it provides a very slight (roughly 1k) endurance buff to the entire raid. This can be just enough to help everyone survive a 60+ stack Heave and additionally finish burning the Machine Core.
- Use Cloud Mind with the utility for 25% damage reduction in order to survive the 60-65 stack Heave so that you have Force Barrier available for the 80-85 stack Heave, unless the Machine Core is extremely close to dying.
- Force Barrier is useful for surviving HK-47′ s Pseudorandom Violence if you are already somewhat low on health when it is aimed at you. It can be better to hit Force Barrier rather than use Force Speed to get out of the cleave, since the cleave is quite large and you might take additional ticks that will kill you.
- If the Machine Core is extremely low on health, you can Force Barrier to survive the final heave.
Shadow/Assassin
- Resilience/Force Shroud can be used to resist damage from Heaves and Unstable Aberration explosions. In particular, you can survive longer than almost any other class by using this skill at the end of the Machine Core burn phase.
- Resilience/Force Shroud can be used in an emergency to mitigate most of the high damage attacks in the fight as well. Using both of them (the normal cooldown and the extra shroud from stealthing) can mitigate a total of 5 ticks of shiv damage from HK, which can save a wipe if you ever get 3 stacks.
- Shadow/Assassin tanks can use Phase Walk and place it in position to use when HK-47 casts Force-Imbued Killshot, as well as for returning to the group quickly for healing during or immediately after Killshots.
- When moving between floors always make sure to unclick your Phase Walk. Accidentally phase walking to a lower floor after Revan is active on the next floor (very common when trying to place phase walk on floor 2 or 3) will instantly kill you.
- Phase walk can be used to save you from being knocked off the platform on the second or third floor, after either a pull in/push out or if you make a mistake during Aberration Explosions. The timing is extremely difficult and under no circumstances should be relied on, but we have done it successfully several times.
- The healing bonus utility for Phase Walk can be very useful to the healers to provide them a slight bonus when healing the high damage at the start of Floor 3, as well for their burst healing during the Machine Core phase.
- It is possible to stealth rez at certain times during the fight, namely during HK phase after Handful of Grenades have been deployed and droid spawns, as well as on Floor 2 supposing the tank is facing Revan’s cleave away, as well as ensuring Force Aberrations and Blades have already spawned and waiting until after the Heave hit. For the majority of the rest of the phase, the constant ticking damage on the raid will prevent any stealth rezzes.
Gunslinger/Sniper
- Hightail It/Covered Escape can used to leave the group for Essence Corruption cleanses on the first floor, as well to break the tether from Malevolent Force Bond.
- Hightail It/Covered Escape can also be timed to resist damage from Heaves, but puts you into cover and changes which way you are facing, so it is dangerous if Unstable Aberrations are exploding.
- Hunker Down/Entrench can be used to resist the pull in/push out from the Machine Heartbeat mechanic. This is more difficult to use for mitigating the pull in during the Machine Core burn, because you cannot be in cover while turning for Unstable Aberrations.
- You can use Dodge/Evasion to get rid of your grenade in HK phase.
- Time Defense Screen/Shield Probe with Unstable Aberration explosions and Heaves rather than using it to mitigate smaller ticks over time. Its cooldown is perfectly aligned with the roughly 30 second timers on these mechanics.
- Scrambling Field/Ballistics Shield can be used for reducing raid damage from the Heave and Unstable Aberrations while at high stacks of Essence Shear during the Machine Core burn.
Scoundrel/Operative
- You can cleanse yourself of the grenade during HK phase. You can even cleanse another person in addition to yourself by using Dodge/Evasion for your own grenade.
- Even if you are a DPS, use Kolto Probe on yourself or other people during breaks between phases, including climbing the staircases from Floor 1 to 2, as well as Floor 2 to Floor 3.
- As Scrapper/Concealment discipline, particularly encouraged if at very high stacks of Essence Shear on the top floor, you can Scamper/Exfiltrate and mitigate Heaves indefinitely. This requires fairly good timing but is something to be aware of. Practice on Storymode and make sure to focus target Revan whenever you intend to do this.
- Although Ruffian Scoundrel/Lethality Operative is not particularly recommended for this fight, you can use a free and instant Kolto Pack/Kolto Infusion on someone in the raid after using Scamper/Exfiltrate to escape the inner ring of the Machine Core for the pull in.
- Time Defense Screen/Shield Probe with Unstable Aberration explosions and Heaves rather than using it to mitigate smaller ticks over time. Its cooldown is perfectly aligned with the roughly 30 second timers on these mechanics.
- It is possible to stealth rez at certain times during the fight, namely during HK phase after Handful of Grenades have been deployed and droid spawns, as well as on Floor 2 supposing the tank is facing Revan’s cleave away, as well as ensuring Force Aberrations and Blades have already spawned and waiting until after the Heave hit. For the majority of the rest of the phase, the constant ticking damage on the raid will prevent any stealth rezzes.
Vanguard/Powertech
- Take the utility to increase the duration and speed on Hold the Line/Hydraulic Overrides. The duration is not only useful for the Machine Heartbeat in/out mechanic on the 2nd and 3rd floors, but also for DPS who may need to run away from the boss for some time, as well as tanks running Trail of Agony.
- You can pull Blades into the center pit from the opposite side by standing on the edge and hitting Grapple.
- Use Hold the Line/Hydraulic Overrides to get into position for HK-47’s Force-Imbued Killshot.
- Hold the Line/Hydraulic Overrides can be used to resist the pull in/push out from the Machine Heartbeat mechanic. On the top floor, it is generally best used for the pull in so that you can remain close to the Machine Core for longer and DPS it.
- If you are specced into the Masterful utility for Sonic Rebounder, which is useful in general for this fight (time it with Heaves in any phase up until Revan is pushed at 9%), you can use it on cooldown on the Machine Core to resist Essence Shear stacks. This will put you at around 3-5 stacks less than everyone else by the end of the fight which is a small advantage for survival.
Commando/Mercenary
- You can cleanse yourself of the grenade during HK phase.
- The utility that increases the knockback range on Concussion Charge/Jet Boost is extremely useful for knocking off the Blades of Alek and Revan throughout the fight.
- Take the utility for increased duration on Hold the Line/Hydraulic Overrides to more easily resist the Machine Heartbeat in/out mechanic on the 2nd and 3rd floors.
- Hold the Line/Hydraulic Overrides can be used to resist the pull in/push out from the Machine Heartbeat mechanic. On the top floor, it is generally best used for the pull in so that you can remain close to the Machine Core for longer and DPS it. This skill is not just useful for DPS, but also for healers who will not have to worry about being pulled around while trying to cast heals.
- Even if you are a DPS, use Kolto Shot and Bacta Infusion/Emergency Scan on yourself or other people during breaks between phases, including climbing the staircases from Floor 1 to 2, as well as Floor 2 to Floor 3.
- Energy Shield/Reactive Shield is ideal for resisting damage from a Heave while at high stacks of Essence Shear during the Machine Core burn.
- Use Kolto Overload/Adrenaline Rush during Unstable Aberration explosions while at high stacks of Essence Shear during the Machine Core burn. This will keep you alive without a medpac if you don’t get a heal immediately.
- Use Diversion/Chaff Flare on cooldown to have a chance to resist the application of Essence Shear stacks during the Machine Core burn.
- Spec into the Electro Shield/Pyro Shield utilities that reflects damage at attackers while using Reactive Shield/Energy Shield, as well as reducing the active cooldown on Reactive Shield/Energy Shield every time you take damage. Thus by popping Reactive Shield/Energy Shield once at the start of Machine Core burn phase, and again when needed as a defensive at high Essence Shear stacks, you will deal some extra damage to the Core.
- Commandos/Mercenaries are also able to take the Reflexive Shield/Energy Rebounder talent which, when combined with Electro Shield/Pyro Shield, allows Reactive Shield to be used slightly more frequently throughout the Machine Core burn. This talent also slightly reduces your damage taken overall.
Group parse of first kill (pre-buff in patch 3.0.2)

Advanced Strategy/Video Discussion
Tanking Overview:
In this video, one of our main tanks (Smugglin) outlines the Revan HM fight from a tanking perspective.
DPS Overview:
In this video, one of our main DPS (Yolo) outlines the Revan HM fight from a DPS perspective.
Heals Overview:
In this video, one of our healers (Raulos) outlines the Revan HM fight from a healing perspective.
Detailed Overview:
In this video, one of our main DPS (Yolo) gives a full analysis of mechanics in a half hour breakdown of the Revan HM fight. This is an extended version of his DPS outline video intended mostly for raid leaders who need to understand every single facet of the fight.
Full Video PoVs
Tank PoV (Shieldtech Powertech):
DPS PoV (Advanced Prototype Powertech):
Healer PoV (Bodyguard Mercenary):
16m Healer PoV (Corruption Sorcerer):

